 |
Para ajudar-se a seguir este tuto clicam para deslocar a flecha |
Abrir os tubes,
duplique e feche os originais
Na palete de cores
Foreground cor #70a556 e Background cor #1f2c07
1) Abrir uma imagen
de 600 x 500 px
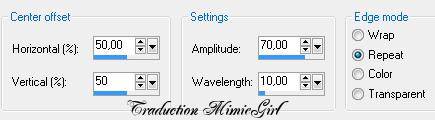
2) Effects/Plugins/Mura's Meister /Cloud
Default
3) Active o tubo "muguet_avril09_artemis"
Copie e cole como nova layer
Layers/Duplicate
No raster 2 (layer original)
4) Effects/Distortion Effects/Ripple
Abaixa a opacidade à 80%
Active à copia
do layer original
Image/Resize 70% (all layers desmarcado)
Adjust/Sharpness/Sharpen
Modar o modo do layer sobre Screen
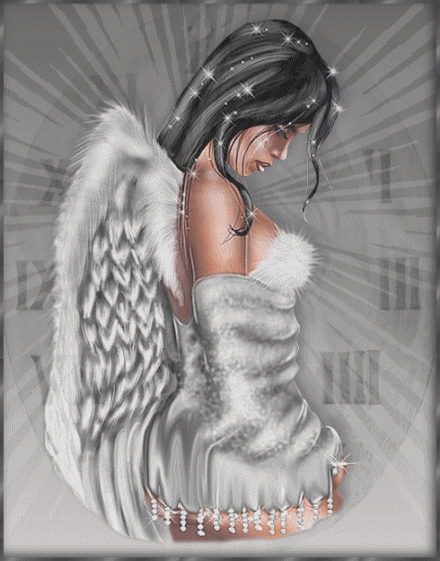
5) Active o tubo "visfemme_15_avril09_artemis"
Copie e cole como nova layer
Image/Resize 70% (all layers desmarcado)
Adjust/Sharpness/Sharpen
Coloque à direita (ver o modelo final)
6) Effects/3D Effects/Drop Shadow
1 5 50 10 cor Preto
7) Nova raster Layers
Na palete de cores
Fichar o Foreground o Background cor Branco
Escreve o
texto
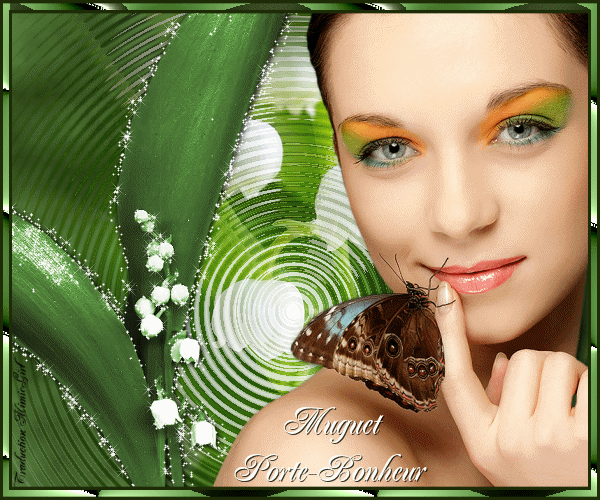
"Muguet
Porte-Bonheur"
Effects/3D Effects/Drop Shadow
1 1 80 0 cor Preto
Layers/Merge Visible
8) Active o tubo "calguisbrunmuguet0000"
Image/Mirror
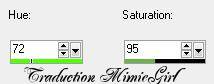
Adjust/Hue and Saturation/Colorize
Coloque à esquerda (ver o modelo final)
Effects/3D Effects/Drop Shadow
1 1 70 10 cor Preto
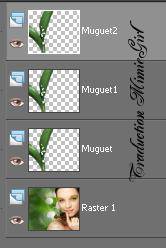
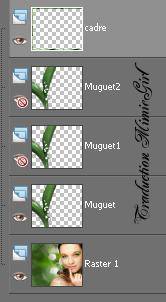
Layers/Duplicate
2 vezes para
ter isto
Renome cada um
"
Muguet - Muguet1 - Muguet2"
9) Active o
layer "Muguet"
Selections/Select
all
Selections/Float
Selections/Defloat
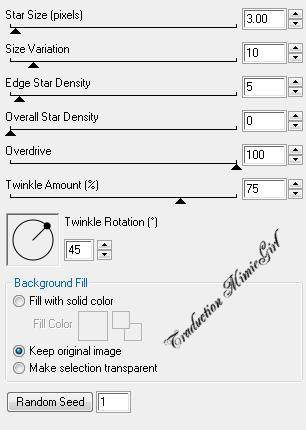
Effects/Plugin/Alien Skin Xenofex2/Constellation
Settings/Bling
Bling
Active o layer
"Muguet1"
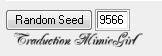
Fazer o mesmo
effeto so modar o "Random Seed"
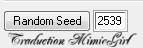
Active o layer
"Muguet2"
Fazer o mesmo
effeto so modar o "Random Seed"
Selections/Select
None
10) Nova raster Layers
Pintar com a cor #1f2c07
Selections /Select all/ Modify /Contract 10
Delete
Selections/Invert
Selections /Select all/ Modify /Contract 2
Selections/Invert
Delete
Pintar com a cor #70a556
Effects/Plugin/VM Natural/Ripper
Default
Selections/Select
None
Nome este
layer "cadre"
11) Nova raster Layers
Assine
Vamos passar à
animação
12) Fichar o
layer "Muguet1 e Muguet2"
Active o layer
"cadre"
Edit/Copy
Special/Copy Merged
13) Abrir o
Animation Shop
Coloque como
new Animation
Volte ao psp
14) Abrir o
layer "Muguet1" e fichar o layer
"Muguet"
Active o layer
cadre
Edit/Copy
Special/Copy Merged
No Animation
Shop
Coloque atraz
da primeira Imagen
Volte ao psp
15) Abrir o
layer "Muguet2" e fichar o layer
"Muguet1"
Active o layer
cadre
Edit/Copy
Special/Copy Merged
No Animation
Shop
Coloque atraz
da segunda Imagen
16) No
Animation Shop
Edit/Select
all
Mude a
velocidade da animação para 15
17) Salva em gif
Tutorial traduzido para MimieGirl em Abril 2010